 Save
Save There's something about March that makes me want to create treats that sparkle with a little mischief. Last year, my daughter came home from school buzzing about leprechauns and pots of gold, and I found myself standing in the kitchen wondering how to turn that magic into something edible. These cake pops came together almost by accident—chocolate crumbs, frosting, and a wild idea to make them look like tiny black cauldrons overflowing with golden coins. The moment she bit into one and her eyes went wide, I knew I'd stumbled onto something special.
I brought a batch to my office potluck, and they disappeared faster than the coffee. One coworker admitted she'd never made cake pops before and was intimidated, so I walked her through the process over lunch. By the end of the week, she'd made her own version and texted me a photo—slightly wonky but absolutely charming. That's when I realized these aren't fancy or pretentious; they're just fun little bundles of joy that anyone can pull off.
Ingredients
- Chocolate cake mix (1 box): This is your foundation, and store-bought is totally fine—nobody needs you stressed about scratch baking before decorating.
- Chocolate frosting (120 g or ½ cup): The glue that holds everything together; it needs to be spreadable but thick enough to bind the crumbs into moldable dough.
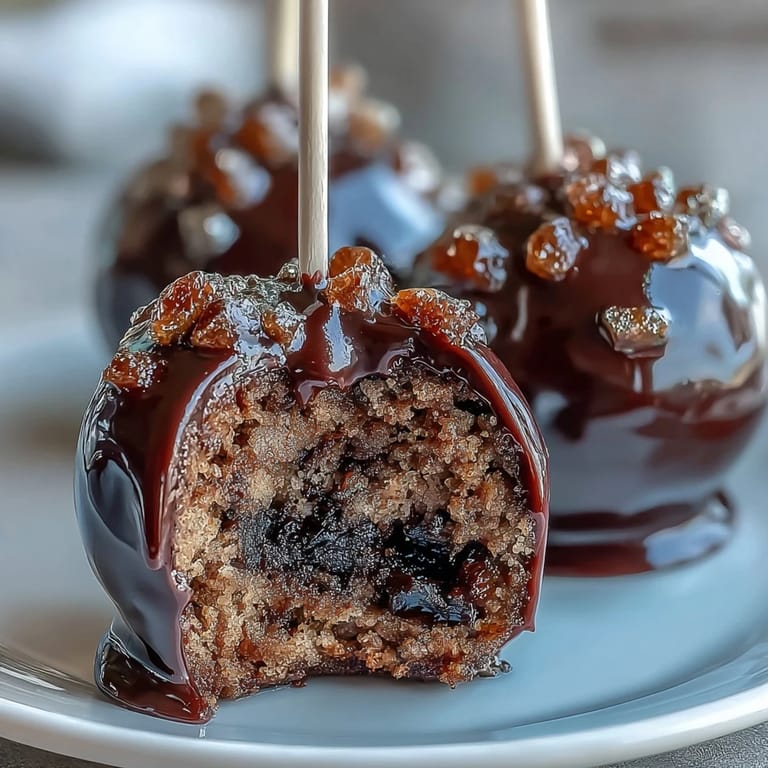
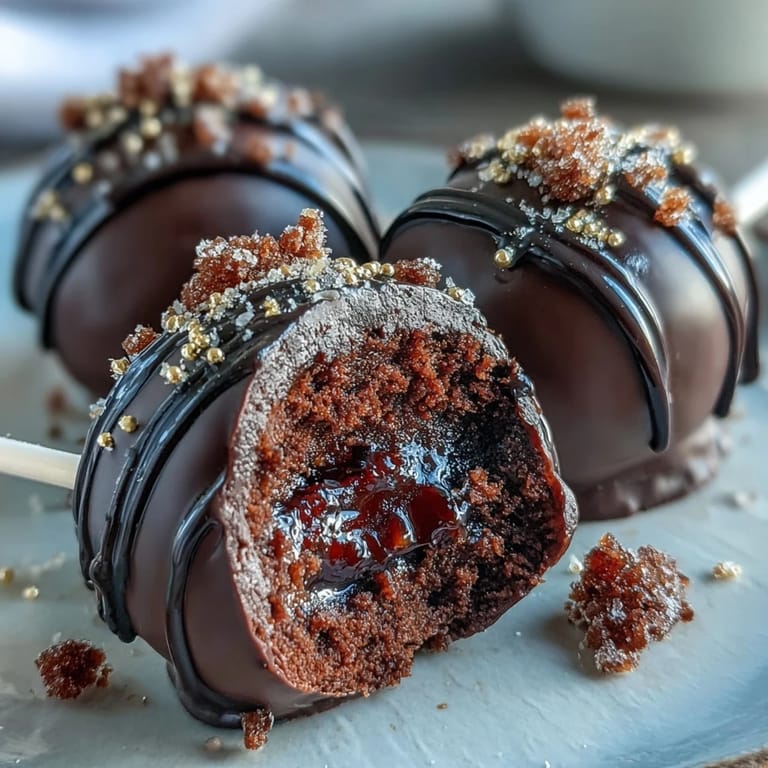
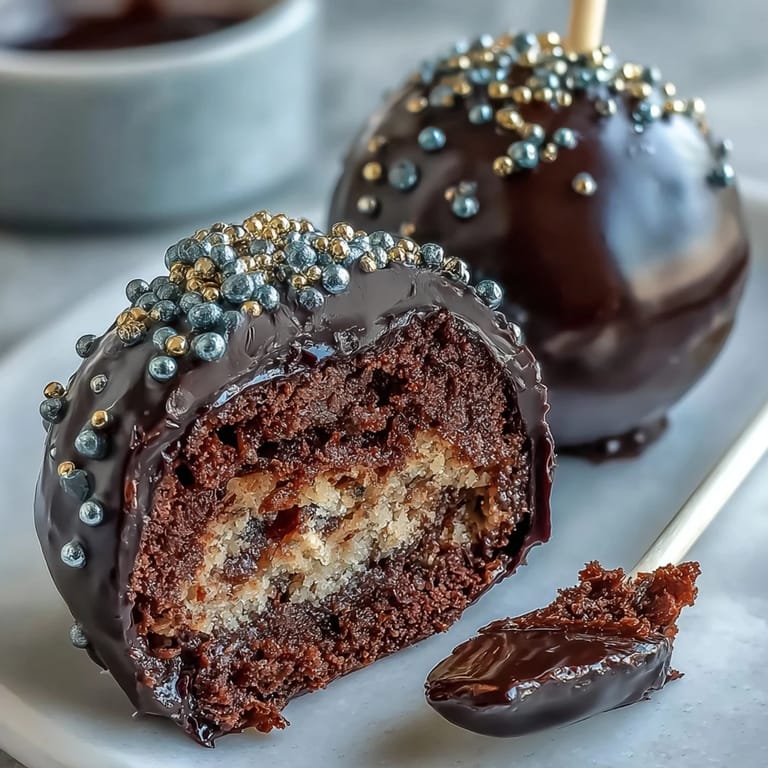
- Black candy melts (400 g or 14 oz): These are specifically designed for dipping and set quickly, unlike regular chocolate which can be temperamental.
- Gold sprinkles or edible gold pearls (48 g or 2 oz): The star of the show; don't skip these or use regular sprinkles, as the magic is in that luxe shimmer.
- Lollipop sticks (24): Your handles; wooden ones work best and feel more authentic than plastic.
- White candy melts (50 g or 2 oz, optional): Perfect for adding a decorative rim that makes each pot look intentional and polished.
- Green fondant or sprinkles (optional): A shamrock accent that takes these from festive to full-on St. Patrick's Day showstopper.
Tired of Takeout? 🥡
Get 10 meals you can make faster than delivery arrives. Seriously.
One email. No spam. Unsubscribe anytime.
Instructions
- Bake your cake foundation:
- Follow the box instructions, then let that cake cool completely—warm cake will make your mixture too soft to shape. I learned this the sticky way.
- Turn cake into crumbs:
- Break the cooled cake into a large bowl and crumble it with your hands until it resembles fine breadcrumbs; this takes longer than you'd think but is oddly therapeutic.
- Mix in the frosting:
- Add the chocolate frosting and stir until you've got a play-dough-like consistency that holds together when squeezed. You might not need all the frosting, so go slowly.
- Shape your pots:
- Roll the mixture into 24 balls about 1.5 inches across, then gently flatten the tops so they look less like spheres and more like actual pot shapes. Embrace the rustic look here.
- First chill:
- Spread them on a parchment-lined tray and refrigerate for 30 minutes; this firms them up so they don't fall apart during dipping.
- Melt your black coating:
- Heat the black candy melts according to package directions, usually in 30-second bursts in the microwave, stirring between each. You want it smooth and pourable but not hot.
- Secure the sticks:
- Dip each stick's tip into the melted black candy, then push it halfway into a cake ball; this sticky base keeps the stick from wobbling. Think of it like anchoring a tiny flagpole.
- Stick chill:
- Pop everything back in the fridge for 10 minutes so the candy sets and the sticks won't spin loose when you dip.
- Full dip:
- Working one at a time, submerge each pop into the black candy, then lift it out and let the excess drip off for a few seconds. Stand it upright in a styrofoam block or cake pop stand to set.
- Gold moment:
- Before the black coating fully hardens, immediately shower the top of each pop with gold sprinkles or pearls; the sticky surface catches them beautifully and makes them look like overflowing treasure.
- Optional rim detail:
- If you're feeling fancy, melt a bit of white candy and pipe a thin line around the top edge of each pot using a piping bag; this adds polish and contrast.
- Shamrock accent:
- If using green fondant, press tiny shamrock shapes onto the black coating, or sprinkle green on one side for a subtle St. Patrick's Day nod.
- Final set:
- Let everything sit undisturbed until the candy hardens completely, which takes about 30 minutes at room temperature.
 Save
Save I'll never forget watching my nephew carefully pick each gold sprinkle off one of these pops and examine it like he'd found actual treasure. He was four, and for him, it was real magic—the kind that tastes like chocolate and hope. That's the real pot of gold here: the joy on someone's face when a simple dessert becomes a tiny edible adventure.
Why Cake Pops Are a Game Changer
Cake pops exist in this beautiful sweet spot between a cupcake and a truffle—you get the cake flavor without the commitment of a whole dessert, and they're small enough to justify eating several. They're also forgiving in ways regular cakes aren't; a slightly bumpy surface or uneven shape somehow makes them more charming. Plus, there's something deeply satisfying about holding a dessert on a stick, which feels more celebratory than eating from a plate.
Decorating Like You Know What You're Doing
The beauty of these pops is that slight imperfections read as intentional charm, not mistakes. A pot that's a little lopsided? Character. Uneven sprinkles? Authentic. The black coating hides sins that would show on a frosted cupcake, so you can relax and focus on having fun. I once rushed through decorating and ended up with pops that looked wonderfully chaotic, and nobody could tell the difference between that batch and my careful ones.
Making Them Feel Festive
These pops shine brightest when you lean into the St. Patrick's Day theme without overthinking it. The black candy melts are already doing heavy lifting, and the gold sprinkles handle the rest—together they scream celebration without requiring you to be a pastry chef. Small touches like the white rim or a green shamrock take them from cute to Instagram-worthy, but honestly, they're just as delicious without the extra steps.
- Pair them with Irish coffee or hot chocolate to complete the festive feeling.
- Store in an airtight container at room temperature for up to three days, though they rarely last that long.
- For a gluten-free version, swap the cake mix and double-check that all your candy melts are certified gluten-free.
 Save
Save These little golden pots remind me that holidays are best celebrated with something that makes people smile before they even taste it. Whether you're making them for a party, a St. Patrick's Day gathering, or just because a Tuesday needs a little luck, these pops deliver joy in bite-sized packages.
Recipe FAQs
- → How do I shape the cake mixture?
Roll the cake crumb and frosting mixture into 1.5-inch balls, then slightly flatten the tops to resemble pot shapes before chilling.
- → What is the best way to coat the cake pops evenly?
Melt the black candy melts thoroughly and dip each pop, allowing excess to drip off. Stand them upright until set for a smooth finish.
- → Can I add decorative accents to the cake pops?
Yes, add gold sprinkles to simulate coins and optionally use white candy melts or green fondant for shamrocks to enhance the festive look.
- → How long should the cake pops chill before decorating?
Chill the rolled cake balls for about 30 minutes before inserting sticks and dipping, to ensure they hold their shape.
- → What storage conditions keep the cake pops fresh?
Store cake pops in an airtight container at room temperature for up to three days to maintain their texture and flavor.