 Save
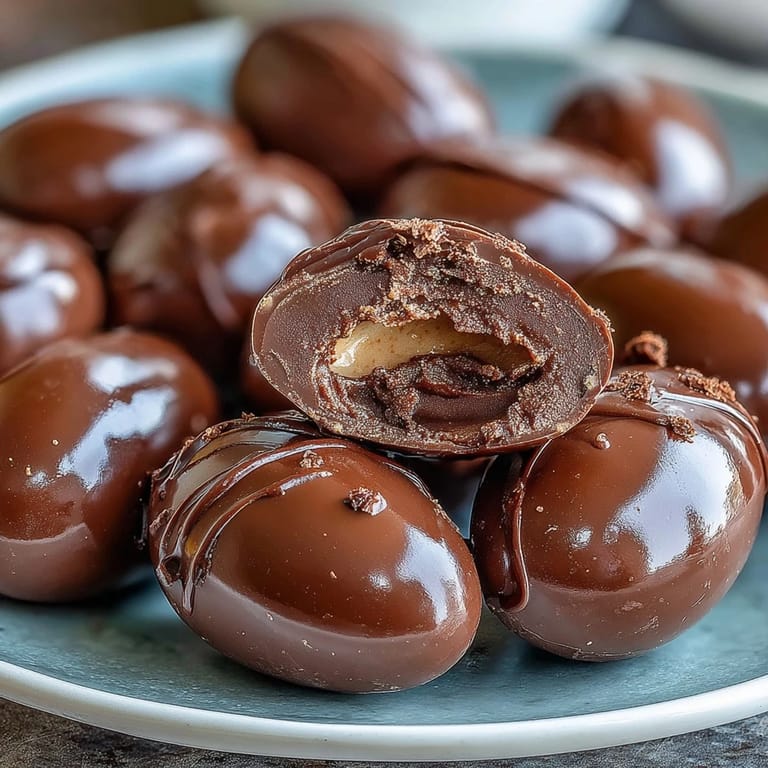
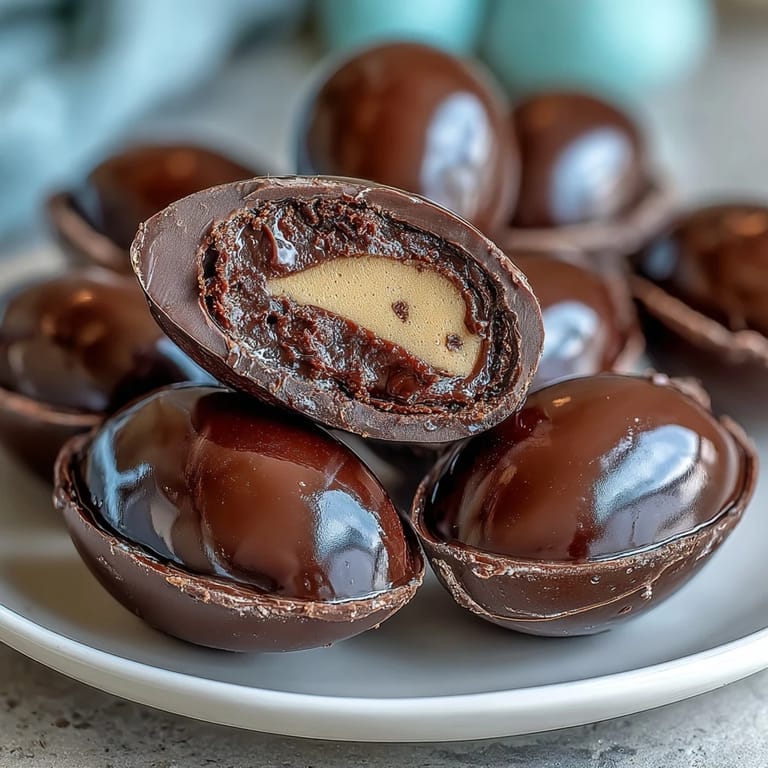
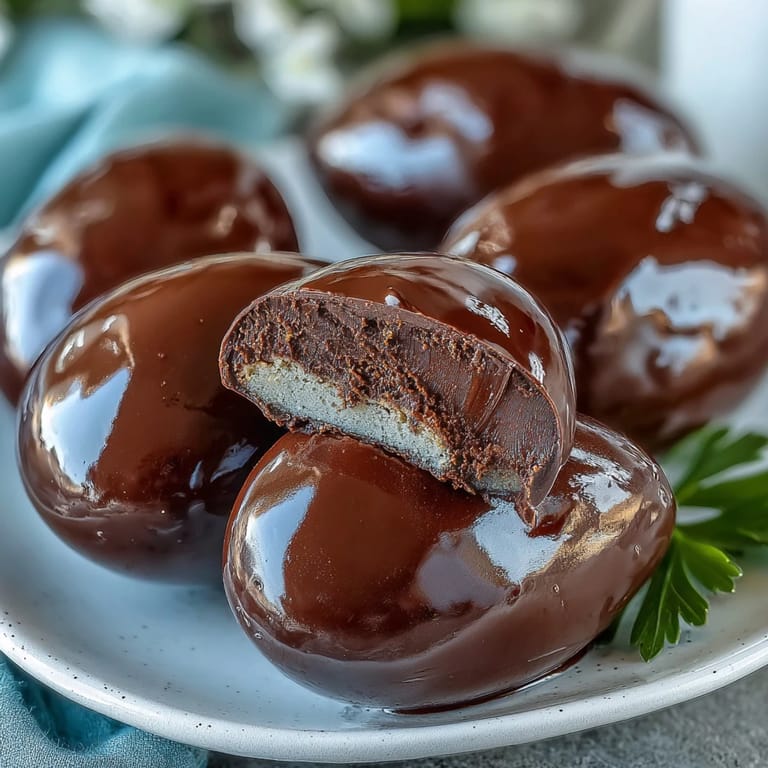
Save The aroma of melting chocolate always reminds me of spring afternoons spent experimenting in the kitchen. When I first made homemade peanut butter Easter eggs, it was less about chasing nostalgia and more about curiosity—could I really rival those glossy store-bought treats with a handful of pantry staples? The rich peanut butter filling and that satisfying chocolate shell felt like a triumph, especially after my initial attempts left me with sticky hands and lopsided eggs. There's a playful energy to hand-shaping each egg, a kind of kitchen craft that rewards patience. Now, every time chocolate hits parchment, I find myself smiling at the simple pleasure of creating something sweet from scratch.
One rainy afternoon, my cousin and I decided to make these for a family gathering and ended up with chocolate smears all over our clothes. We laughed while perfecting the dipping technique and debated sprinkle choices, turning the whole process into an impromptu contest. Not only did the eggs vanish instantly, but they also sparked conversations and left behind a few satisfied traces of chocolate on smiling faces. The kitchen felt warmer somehow, crowded with anticipation and lingering sweetness. Those moments transformed this dessert into a family tradition rather than just a holiday treat.
Ingredients
- Creamy peanut butter: Smooth is key for that melt-in-your-mouth filling—if you want texture, swap for crunchy and let the bits surprise you.
- Unsalted butter, softened: A gentle blend with peanut butter gives richness without overpowering; letting it reach room temperature prevents lumps.
- Powdered sugar: Works as both sweetener and binder, helping the filling hold its shape for easy molding.
- Vanilla extract: A splash adds roundness to the filling, enhancing both aroma and flavor.
- Salt: Just a pinch balances the sweetness and gives depth to the peanut butter.
- Semisweet or milk chocolate chips: Choose your favorite—semisweet for a grown-up finish, milk for old-school comfort.
- Coconut oil or vegetable shortening: This is the secret to silky, glossy chocolate that doesn't crack.
- Sprinkles or colored candy melts: Totally optional, but they turn each egg into a party; I keep them handy for extra smiles.
Tired of Takeout? 🥡
Get 10 meals you can make faster than delivery arrives. Seriously.
One email. No spam. Unsubscribe anytime.
Instructions
- Blend the filling:
- Combine peanut butter, softened butter, vanilla extract, and salt in a large bowl and beat until smooth and creamy. The mixture will smell nutty and inviting, so keep an eye on the texture as it turns light and fluffy.
- Add powdered sugar:
- Slowly mix in powdered sugar until the dough becomes thick and stands up to shaping. It should feel moldable but not sticky—if it clings too much, sprinkle in a little extra sugar.
- Mold the eggs:
- Scoop about 2 tablespoons of filling, roll gently in your palms, and press into oval shapes. Set each egg onto parchment so they stay neat and easy to handle.
- Chill the eggs:
- Freeze for at least 30 minutes until firm, which makes dipping less messy. The filling should feel solid but not rock hard.
- Melt the chocolate:
- Combine chocolate chips with coconut oil or shortening in a microwave-safe bowl and heat in short bursts, stirring thoroughly. The mix should become glossy and smooth, ready for coating.
- Dip the eggs:
- Using a fork, gently submerge each chilled egg in chocolate and let the excess drip off, then return to the parchment. Work quickly so the coating stays shiny and consistent.
- Add decorations:
- If you like, drizzle with melted colored candy or sprinkle over festive toppers before the chocolate settles. Creativity is encouraged—this is your moment to play.
- Finish chilling:
- Refrigerate finished eggs at least 15 minutes until the chocolate is fully set. The treat is now ready for sharing or sneaking straight from the fridge.
 Save
Save Watching friends gather around the tray and hunt for the prettiest chocolate egg made me realize these treats were more than just dessert—they were invitation to linger, chat, and enjoy shared anticipation. There's something about offering handmade sweets that turns ordinary moments memorable.
Getting Everyone Involved
Letting little hands join in for shaping or decorating can make the kitchen messier, but it also makes the experience more joyful. Each person's version turns out a little different, and the laughter that follows becomes a cherished part of the recipe. This dessert is a natural conversation starter, encouraging everyone to share their own techniques and favorite toppings. Don't worry about perfection; it's the whimsy that matters most.
Troubleshooting Sticky Fillings
If your peanut butter dough is too soft to shape, try chilling it for 10-15 minutes before molding. Sometimes humidity or overly warm butter throws off the texture, so don't hesitate to adjust with a bit more powdered sugar. Making small tweaks as you go gets easier the more you bake—watching out for consistency before you dive into dipping helps avoid messes. Stay flexible and trust your senses.
How to Store and Serve Beautifully
Storing eggs in a single layer in the refrigerator keeps their shapes and coating intact and makes serving a breeze at gatherings. Presentation can be as simple as a platter lined with festive paper or as playful as stacking eggs in a nest of sprinkles. I recommend offering them cold for best texture, especially when chocolate is freshly set.
- Bring eggs out 5-10 minutes before eating so filling softens slightly.
- If making ahead, keep decorations minimal to avoid smudges.
- Airtight containers prevent the chocolate from blooming and keep flavors at their best.
 Save
Save Homemade peanut butter eggs are a simple pleasure, and sharing them brings out the best in every kitchen gathering. Enjoy the process, and let each bite remind you of spring’s playful spirit.
Recipe FAQs
- → How do I shape the peanut butter eggs?
Roll the mixed peanut butter filling into ovals, then gently mold with your hands to resemble eggs before chilling.
- → Can I use different types of chocolate?
Yes, try semisweet, milk, or dark chocolate for the coating. White chocolate also works for a sweeter variation.
- → Should the eggs be chilled before coating?
Freezing the formed eggs for 30 minutes makes them easier to dip and helps the chocolate set quickly.
- → How can I decorate the eggs?
Add sprinkles or drizzle with colored candy melts right after dipping to give a festive look before the chocolate sets.
- → How long can I store finished eggs?
Keep them in an airtight container in the refrigerator for up to two weeks for best freshness and texture.
- → Are there allergen concerns for these eggs?
They contain peanuts, dairy, and may contain soy. Check all ingredient labels if preparing for allergy-sensitive guests.