 Save
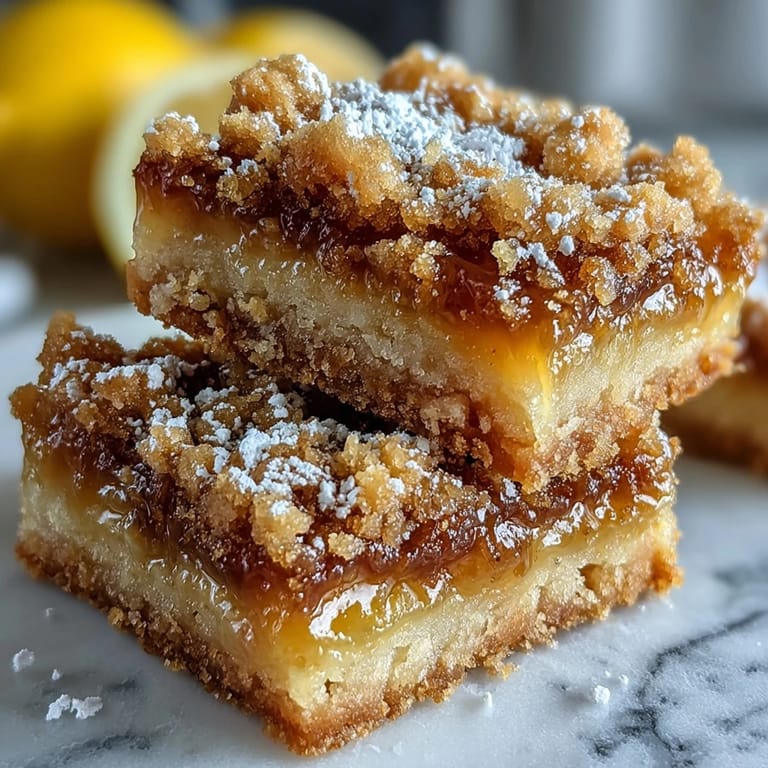
Save My kitchen smelled like sunshine the afternoon I pulled these bars from the oven, their golden tops crackling as they cooled. I had squeezed the lemons by hand, my fingers sticky and stinging from the zest, but the brightness filling the room made every second worth it. A neighbor knocked just as I was dusting them with powdered sugar, and we ended up eating three bars each, standing at the counter, laughing about how impossible it was to stop at one. That tartness, that buttery crumble, it was like tasting summer in the middle of an ordinary Tuesday. I have made them a dozen times since, and they never last more than a day.
I brought a pan to a potluck once, and someone asked if I had ordered them from a bakery. I laughed and admitted I had forgotten to chill them long enough, so they were a little messy to cut, but no one cared. We ate them with forks, straight from the pan, and by the end of the night the dish was scraped clean. One friend tucked the recipe card into her purse and texted me a photo of her own batch two days later. That is when I realized these bars have a way of spreading joy, one crumbly square at a time.
Ingredients
- All-purpose flour: Forms the base of both the crust and the crumb topping, giving structure without weighing things down, and I have learned that spooning it into the measuring cup instead of scooping keeps the bars tender.
- Granulated sugar: Sweetens the crust and balances the tartness of the lemon filling, and I sometimes reduce it slightly in the filling if my lemons are especially sweet.
- Baking powder: Helps the crust and filling puff just enough to stay light, but too much will make the filling foam, so measure carefully.
- Salt: A pinch in every layer sharpens the lemon flavor and keeps the sweetness from feeling flat.
- Unsalted butter: Melts into the crumbs and creates that rich, golden base, and I always let it cool for a minute before mixing so it does not clump the flour.
- Large eggs: Bind the filling and give it that custard like texture, and room temperature eggs whisk smoother than cold ones.
- Fresh lemon juice: The star of the show, bringing bright acidity that makes your mouth water, and I always taste my lemons first because some are sweeter than others.
- Lemon zest: Adds aromatic oils that make the flavor more complex and floral, and I use a microplane to avoid the bitter white pith.
- Powdered sugar: Optional for dusting, but it makes the bars look bakery pretty and adds a little extra sweetness when you take that first bite.
Tired of Takeout? 🥡
Get 10 meals you can make faster than delivery arrives. Seriously.
One email. No spam. Unsubscribe anytime.
Instructions
- Prep Your Pan:
- Preheat your oven to 350°F and grease a 9x9 inch baking pan, or line it with parchment paper so you can lift the bars out cleanly later. I like to leave a little overhang on two sides to use as handles.
- Mix the Crumb Base:
- In a medium bowl, whisk together 1 cup flour, 1/2 cup sugar, 1/2 teaspoon baking powder, and 1/4 teaspoon salt, then pour in the melted butter and stir until the mixture looks like wet sand. Reserve 1/2 cup of this mixture in a small bowl for the topping.
- Press and Bake the Crust:
- Press the remaining crumb mixture firmly and evenly into the bottom of your prepared pan, using your fingers or the bottom of a glass to smooth it out. Bake for 10 to 12 minutes until the edges just start to turn golden.
- Whisk the Lemon Filling:
- While the crust bakes, whisk together the eggs and 1 cup sugar in a large bowl until smooth, then add the lemon juice, lemon zest, 1/4 cup flour, 1/2 teaspoon baking powder, and a pinch of salt. Whisk until no lumps remain and the mixture is silky.
- Assemble and Bake:
- Pour the lemon filling over the hot crust as soon as it comes out of the oven, then sprinkle the reserved crumb mixture evenly over the top. Return the pan to the oven and bake for 20 to 25 minutes, until the filling is set and jiggles only slightly in the center.
- Cool and Chill:
- Let the bars cool in the pan on a wire rack for at least 1 hour, then transfer to the refrigerator and chill for at least 1 more hour before slicing. The filling firms up as it cools, making clean cuts possible.
- Slice and Serve:
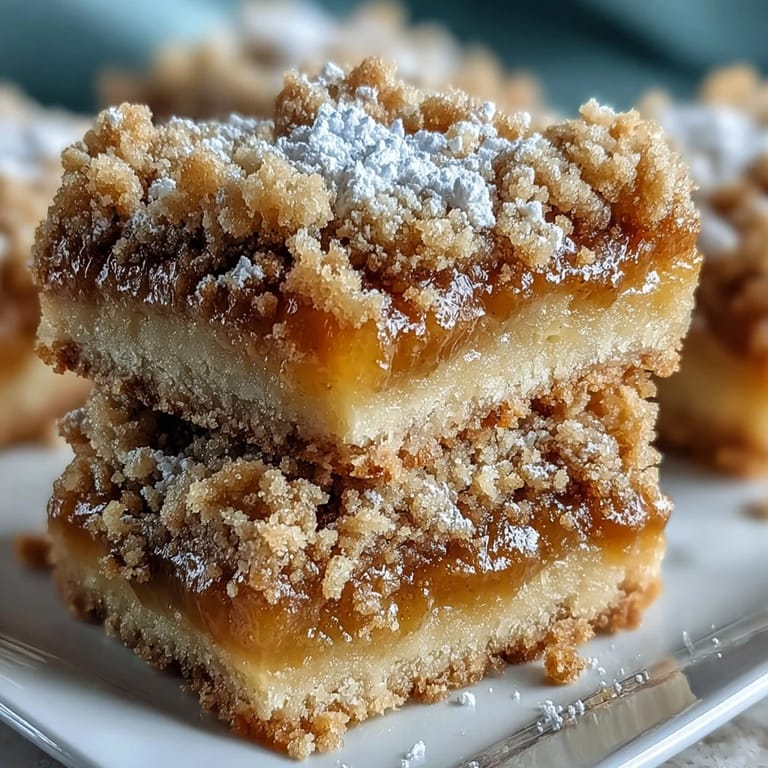
- Use a sharp knife to cut the bars into 16 squares, wiping the blade between cuts for the neatest edges. Dust with powdered sugar just before serving if you want them to look extra special.
 Save
Save I made these for my mom on her birthday, and she ate one slowly, savoring every bite, then wrapped two more in a napkin to take home. She called me that night to say they reminded her of the lemon bars her grandmother used to make, even though the recipes were probably nothing alike. Sometimes a flavor just carries you somewhere, and that is the magic of a simple dessert done right. I keep the recipe in my phone now, because you never know when you will need to bake a little brightness into someone's day.
How to Store and Keep Them Fresh
These bars keep beautifully in an airtight container in the refrigerator for up to a week, and honestly, they taste even better on day two when the flavors have melded together. I stack them between layers of parchment paper to keep them from sticking, and I always hide a few in the back of the fridge for myself. If you want to freeze them, wrap individual bars tightly in plastic wrap and then in foil, and they will keep for up to three months. Let them thaw in the fridge overnight, and they taste just as bright and buttery as the day you made them.
Ways to Make Them Your Own
I have swapped lime juice and zest for lemon when I wanted something a little more tropical, and the bars turned out wonderfully tart and unexpected. You can also add a tablespoon of cornstarch to the filling if you prefer a firmer, sliceable texture, which works great if you are packing them for a picnic. A few times I have stirred a handful of fresh blueberries into the filling before baking, and the berries burst into jammy pockets that pair beautifully with the lemon. If you are feeling fancy, a thin layer of lemon glaze drizzled over the top after they cool adds an extra hit of sweetness and makes them look bakery perfect.
Serving Suggestions and Pairings
I love serving these bars cold, straight from the fridge, with a cup of hot tea on a lazy afternoon. They also pair beautifully with a chilled glass of Moscato or sparkling lemonade if you are hosting a summer gathering. Sometimes I plate them with a dollop of whipped cream and a few fresh berries for a simple but elegant dessert that feels more special than the effort it took.
- Dust with powdered sugar just before serving for a classic, pretty finish.
- Serve alongside vanilla ice cream for a sweet and tangy contrast that melts together perfectly.
- Pack them in a tin for a homemade gift that always gets rave reviews.
 Save
Save These lemon crumb bars have become my go to whenever I need something bright, simple, and guaranteed to make people smile. I hope they bring as much sunshine into your kitchen as they have into mine.
Recipe FAQs
- → Why must these chill for two hours before slicing?
The chilling time allows the lemon filling to fully set, creating clean neat squares when cut. Without proper cooling, the filling remains too soft and will spread rather than holding its shape.
- → Can I use bottled lemon juice instead of fresh?
Fresh lemon juice provides the brightest, most authentic citrus flavor. Bottled juice lacks the vibrant zestiness that makes these bars special and may result in a duller taste.
- → What makes the crumb topping stay tender?
The melted butter creates a moist crumb that remains tender rather than hard. Baking just until lightly browned ensures the topping stays delicate and crumbly rather than becoming tough or dry.
- → How do I know when the filling is set?
The filling should no longer jiggle when you gently shake the pan. The center will appear set rather than liquid, and the edges should pull away slightly from the pan sides.
- → Can I make these ahead for a party?
These bars actually improve after a day in the refrigerator as flavors meld and deepen. Prepare them up to 24 hours ahead, then slice and dust with powdered sugar just before serving.
- → What's the best way to get clean cuts?
Use a sharp knife wiped clean between each cut. For even cleaner slices, run the knife under hot water and dry thoroughly before cutting through the chilled bars.