 Save
Save My cousin showed up one Saturday morning with a muffin tin and a bag of russet potatoes, insisting we needed to make breakfast something more interesting than toast. Thirty minutes later, when we pulled those golden, crispy potato nests from the oven with runny eggs nestled inside, I understood why she'd been so excited. There's something about biting through that crackling potato shell into creamy yolk that feels more like a celebration than a weekday breakfast. Now they're my go-to when I want to impress without spending hours in the kitchen.
I made these for my roommate's birthday brunch last fall, when everyone was still pretending summer wasn't over. She bit into one, closed her eyes, and declared it the best thing she'd eaten in weeks—all because I'd discovered that pressing the potatoes firmly into the muffin cups made them sturdy enough to hold everything without falling apart. That one small detail changed everything about how I approach this recipe now.
Ingredients
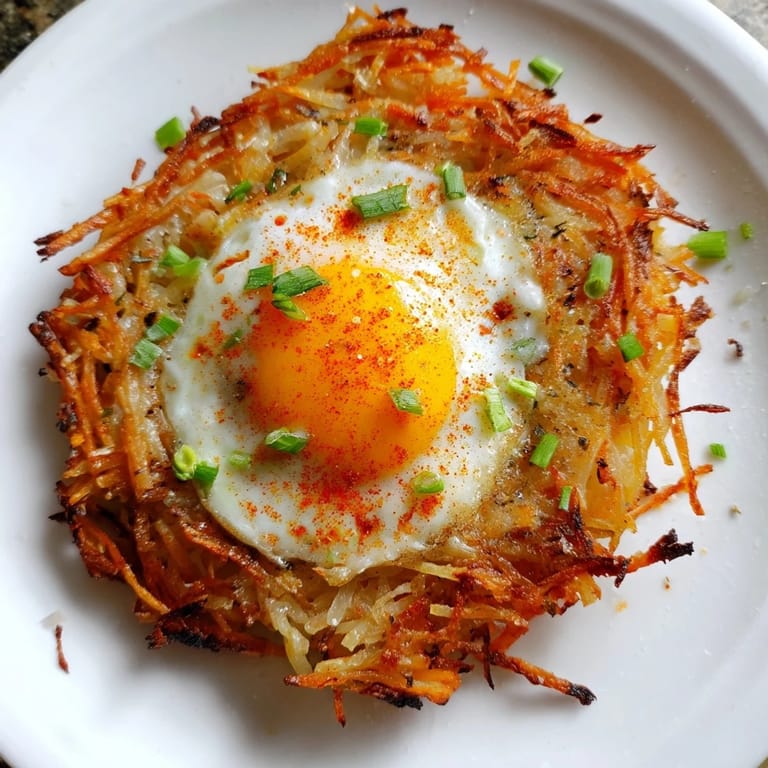
- Shredded russet potatoes: Three cups might seem like a lot, but they shrink as they cook and crisp up beautifully—the starch content in russets is exactly what makes them crispy rather than mushy.
- Salt and black pepper: Don't skip seasoning the potatoes directly; it makes every bite taste intentional rather than bland.
- Melted unsalted butter: This is what creates that golden, almost fried texture on the edges of your nests.
- Large eggs: Fresh eggs have yolks that stand taller and taste richer—it matters here.
- Shredded cheddar cheese: Sharp varieties add more flavor, but mild works too if that's your preference.
- Chopped scallions or chives: The green shoots add brightness that cuts through the richness of the egg and cheese.
- Paprika: Optional, but it adds a gentle warmth and makes them look even more appetizing.
Tired of Takeout? 🥡
Get 10 meals you can make faster than delivery arrives. Seriously.
One email. No spam. Unsubscribe anytime.
Instructions
- Get your setup ready:
- Preheat your oven to 400°F and grease a 12-cup muffin tin thoroughly—spray works fastest, but melted butter does too. This prevents the frustrating moment where your perfect nests stick stubbornly to the pan.
- Prepare and season the potato base:
- Combine your shredded potatoes with salt, pepper, and melted butter in a large bowl, mixing until every strand gets coated. The moisture should feel even throughout, not pooling at the bottom.
- Press potatoes into nests:
- Use about 1/4 cup per cup and press firmly into the bottom and sides—think of it like shaping a bowl. This is the move that keeps everything together, so don't be gentle here.
- Pre-bake the shells:
- Bake for 15 to 20 minutes until the edges turn golden and you can hear a slight crackle when you tap the muffin tin. The potatoes should feel crisp, not just cooked through.
- Add your cheese and herbs:
- Sprinkle a little cheese and scallions into each nest, then crack one egg carefully into the center. Top with paprika, remaining cheese, and more scallions.
- Finish baking:
- Return to the oven for 10 to 12 minutes until the eggs set to your liking—I like the whites completely firm but yolks still soft in the middle. The timing depends on how deep your muffin cups are.
- Cool and release:
- Let them rest for 3 to 5 minutes so they firm up slightly, then gently run a butter knife around the edge and lift them out. They should come free easily if you've pressed and buttered properly.
 Save
Save There was a quiet Tuesday morning when my mom came to visit and I made these while we caught up over coffee. She watched the whole process, asking questions about why I did certain things, and by the time we sat down to eat, she understood why I make them so often. It's become our thing now—she makes them at home too, and sometimes she texts me photos.
Variations That Work
These cups are genuinely flexible once you understand the basic structure. I've added crumbled cooked bacon, sautéed mushrooms, diced bell peppers, even leftover roasted broccoli, and the result has always been delicious. The potato shell is sturdy enough to hold whatever you want inside, so think of it as a blank canvas rather than a rigid formula. One thing I learned: add soft or pre-cooked ingredients, not raw ones, since the baking time is short.
Cheese Swaps and Flavor Shifts
Cheddar is my constant, but I've discovered that Swiss cheese gives a slightly nuttier taste, while pepper jack brings a gentle heat that wakes everything up. Mozzarella makes them milder and creamier, which is perfect if you're serving kids or anyone who prefers subtler flavors. The cheese is one of the easiest ways to change the whole personality of the dish without starting over.
Making Them Ahead and Storing
You can bake the potato nests the day before, store them in the fridge, and add eggs in the morning for a faster finish. They reheat beautifully at 350°F for about 8 minutes if you've already got eggs baked in. The trickiest part is knowing that they're best eaten fresh and warm, so timing them to finish right as everyone sits down matters more than you'd think.
- Wrap any leftovers loosely in foil and they'll keep in the fridge for up to three days.
- You can also freeze pre-baked empty nests for a week or two, then thaw and fill them as needed.
- Always let them cool slightly before eating so you don't burn your mouth on the hot cheese and potato.
 Save
Save These potato nests have become my answer to the question of how to make ordinary mornings feel special without much effort. They've earned a permanent place on my weekend breakfast rotation.
Recipe FAQs
- → How do I get the nests extra crispy?
Bake the potato shells a few minutes longer before adding the eggs to ensure a crispier texture.
- → Can I use other types of cheese in the nests?
Yes, Swiss, mozzarella, or pepper jack cheeses work well for different flavors and textures.
- → What can I add to the filling for more variety?
Try adding cooked bacon, sautéed vegetables, or herbs to customize the filling to your taste.
- → How can I make the nests easier to remove from the muffin tin?
Let the nests cool for a few minutes and gently loosen the edges with a butter knife before removing.
- → Can these be prepared ahead of time?
You can bake the nests and add the filling later, baking just before serving to keep them fresh and crispy.